

Cool Realistic Animals To Draw


Fur is an amazing structure; millions of hair that make a warm, fluffy coat that we can't stop ourselves from touching, stroking and cuddling! (even if it's fur of a hungry tiger). It also seems to be very time-consuming to draw realistically. Would you like to learn a few non-time-consuming tricks to draw natural-looking fur? Well that's my mission in this tutorial.
1. What is Fur?
Step 1
Usually my first rule is you need to understand the object to draw it. While it's very helpful with bigger objects like whole animals or their body parts, it may be confusing with smaller things. Of course, outstanding knowledge of dog paws' pads is admirable, most of us will never need it. It's the same with fur. You don't need to learn about single hairs, because nobody even sees them! What we can see is fur, and if you draw it correctly, people will get the impression it's made of hair.
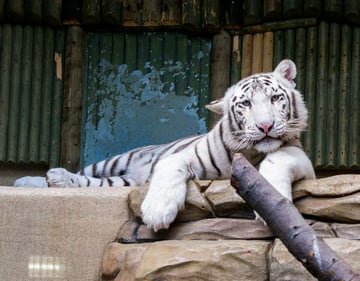
This tiger is definitely covered with fur, right? But can you really see the hairs?

Step 2
Hairs make strands, strands make coats, coats make fur - that's the first rule. Even when an animal seems to have smooth fur laying flat against the skin, the strands appear when the skin is bending/creasing.


Step 3
The biggest problem with fur is it can't be drawn in 2D. A beginner draws a flat silhouette, and then tries to add fur, also in 2D. It's physically impossible! Just look at this, literally a fur ball. The hairs in 3D come under perspective. It's the same with strands.


2. Understanding Fur in 3D
Step 1
Let's see a real-life example. Animals with thick fur, like this wolf (picture courtesy of Jennifer McKay), appear to be bigger than if they were bald. Let's undress it to see where the fur starts.


Step 2
Now look at direction of the fur. It doesn't simply go from front to back. The coats (I'm sure you can see them now) start from various points. The borders between them are what most people ignore when drawing. We'll need to take a good look at them.


Step 3
There are two kinds of borders. Overlapping happens when one coat covers another. It's pretty simple to imagine and draw.


Step 4
The second kind of border requires some 3D thinking. Sometimes both coats lay on the same level, but their strands go to opposite directions. That's when breaking appears. Strands are bending, revealing darker gaps between them. This is the under coat of the fur you can see, which is a lot thicker in comparison of the lighter, longer fur you can see on top.


3. A Few Practical Tips
Step 1
There are a few things you should know before starting. This is how you can quickly draw a simplified strand. See? It's fast and efficient.


Step 2
When you want to overlap coats, it's good to start from the bottom one. This way you'll avoid crossing the strands.


Step 3
When it comes to breaking, draw bent strands, leaving some irregular gaps between them.


Step 4
Afterwards, fill the gaps with black to represent the undercoat.


Step 5
Last but not least, when you want to stress contours, never stress all of them. Look at the picture below, which "strand" looks more natural?


4. Draw a Cat: the Head
Step 1
You can treat this exercise as a continuation of my cat tutorial. Sketch the pose first on a cheap paper, using any pencil you want. Don't worry if it turns out messy, it's just a base!


Step 2
Use a fine liner/marker/pen to stress the body contours. We need to make it darker than the sketch underneath so you can see these lines through better quality paper.


Step 3
Now place your sketch under the sheet you're going to use for the actual picture. You should still be able to see the contours. If not (because your sheet is too thick), you can always use good old window for the next steps.


Step 4
Draw the elements that aren't fur-dependable, like eyes or nose. This is also the moment you're setting the contrast of whole picture - the nostrils will be the darkest place.


Step 5
Take a mechanical or classic, but strongly sharpened HB pencil. Sketch very lightly the contours of fur according to the breed you're drawing. I'm going to draw something similar to a Maine Coon.


Step 6
Let's take care of the ears first. Add some loose strands on their base and smooth hair on the tip.


Step 7
My cat is going to have very long hair, so I add cute tufts inside the ears.


Step 8
Draw the edges of the ears that are visible under the hair and darken it.


Step 9
Take a B pencil (or anything slightly softer than HB) and stress the darker edges. Use it very sparingly - the more you use it, the less impact it makes. One more important thing: keep your pencils perfectly sharpened all the time. It's crucial for consistency. If it's tiring for you to keep this up, buy a mechanical pencil, they let you stay focused on drawing.


Step 10
Draw strands on the edge of every coat. Keep them loose and wavy. Don't dive into details. Remember, you draw an impression of fur, not each hair.


Step 11
Add another coat between them.


Step 12
Add a shadow between the coats.


Step 13
Add a bit of hair under the eyes too. Remember: the more lines, the darker the area. So, if you want to keep some area light, draw as little lines as possible. Sometimes it's even better not to draw anything!


Step 14
Add short hair on the nose and cover the mouth with hair.


Step 15
There are "breaking" between the ears and the rest of the head, and also in the middle of the forehead.


Step 16
Cover the forehead with very light, thin hair, just to pretend it's a furry area too.


Step 17
Add the whiskers! Keep them long, wavy and random.


5. Draw the Chest
Step 1
Plan the coats on the chest. Remember to keep them very light. It's good to check some references of your animal for this step. Good news is you just need them to estimate the length of coats, and you don't even need to find the same pose you're drawing!


Step 2
Draw the strands on every coat. Again, they should be loose and wavy, going in random directions.


Step 3
Add some strands breaking the default coats' lines. They'll create a natural feel.


Step 4
Add a shadow between the coats, just like before. Whenever you feel you need to press the pencil harder, switch to B.


Step 5
Again, add more black.


6. Draw the Forelegs
Step 1
Sketch the paws and plan the coats for the legs.


Step 2
Add fur to the paws. It shouldn't be too detailed as the fur goes in one direction and is short.


Step 3
Sketch strands for the legs. Adding breaking here isn't necessary, but it's going to look quite nice.


Step 4
Now the shading.


Step 5
We're now done with the left part. It's good to do any fixes now, because later it's going to be hard to draw anything here without touching (and smudging) the right part.


7. Draw the Barrow
Step 1
Time to add some coats to the barrow.


Step 2
Now the wavy strands. Can you see the little breaking on the thigh? Most furry mammals have it.


Step 3
Shading with HB pencil...


Step 4
...and now with B.


8. Draw the Hind Legs
Step 1
Let's take care of hind legs now.


Step 2
After all this time it's easy, isn't it?


Step 3
Follow the similar process for the front legs to the hind.


9. Add Fur to the Tail
Step 1
Let's add a fluffy tail. There's no other place with such simple and regular coats!


Step 2
We need to remember about gravity here.


Step 3
I made the strands totally crazy. Fluffy tail for a fluffy cat!


You've Got the Key to Fluffiness!
You can now draw fur quickly and efficiently, without counting single hairs.
Cool Realistic Animals To Draw
Source: https://design.tutsplus.com/articles/how-to-draw-animals-quickly-render-fur--vector-17833
Posted by: shriversincy1977.blogspot.com
0 Response to "Cool Realistic Animals To Draw"
Post a Comment