

How To Turn On Raspberry Pi Camera
Camera setup on Raspberry Pi 4
Wireless camera setup
Author: Eduardo Padrón
I of the most used applications in Raspberry is the utilise of cameras, to use Tensorflow and give it the ability to detect objects. At present that the Raspberry Pi is fast plenty to perform machine learning🧠, calculation these functions in projects is easier.
This guide volition evidence you lot the steps to learn how to connect the Raspberry Pi photographic camera module, accept photos, record videos, and apply format changes. It is important to know the camera module 📷 well before starting to create our apps.
Permit'southward get started.
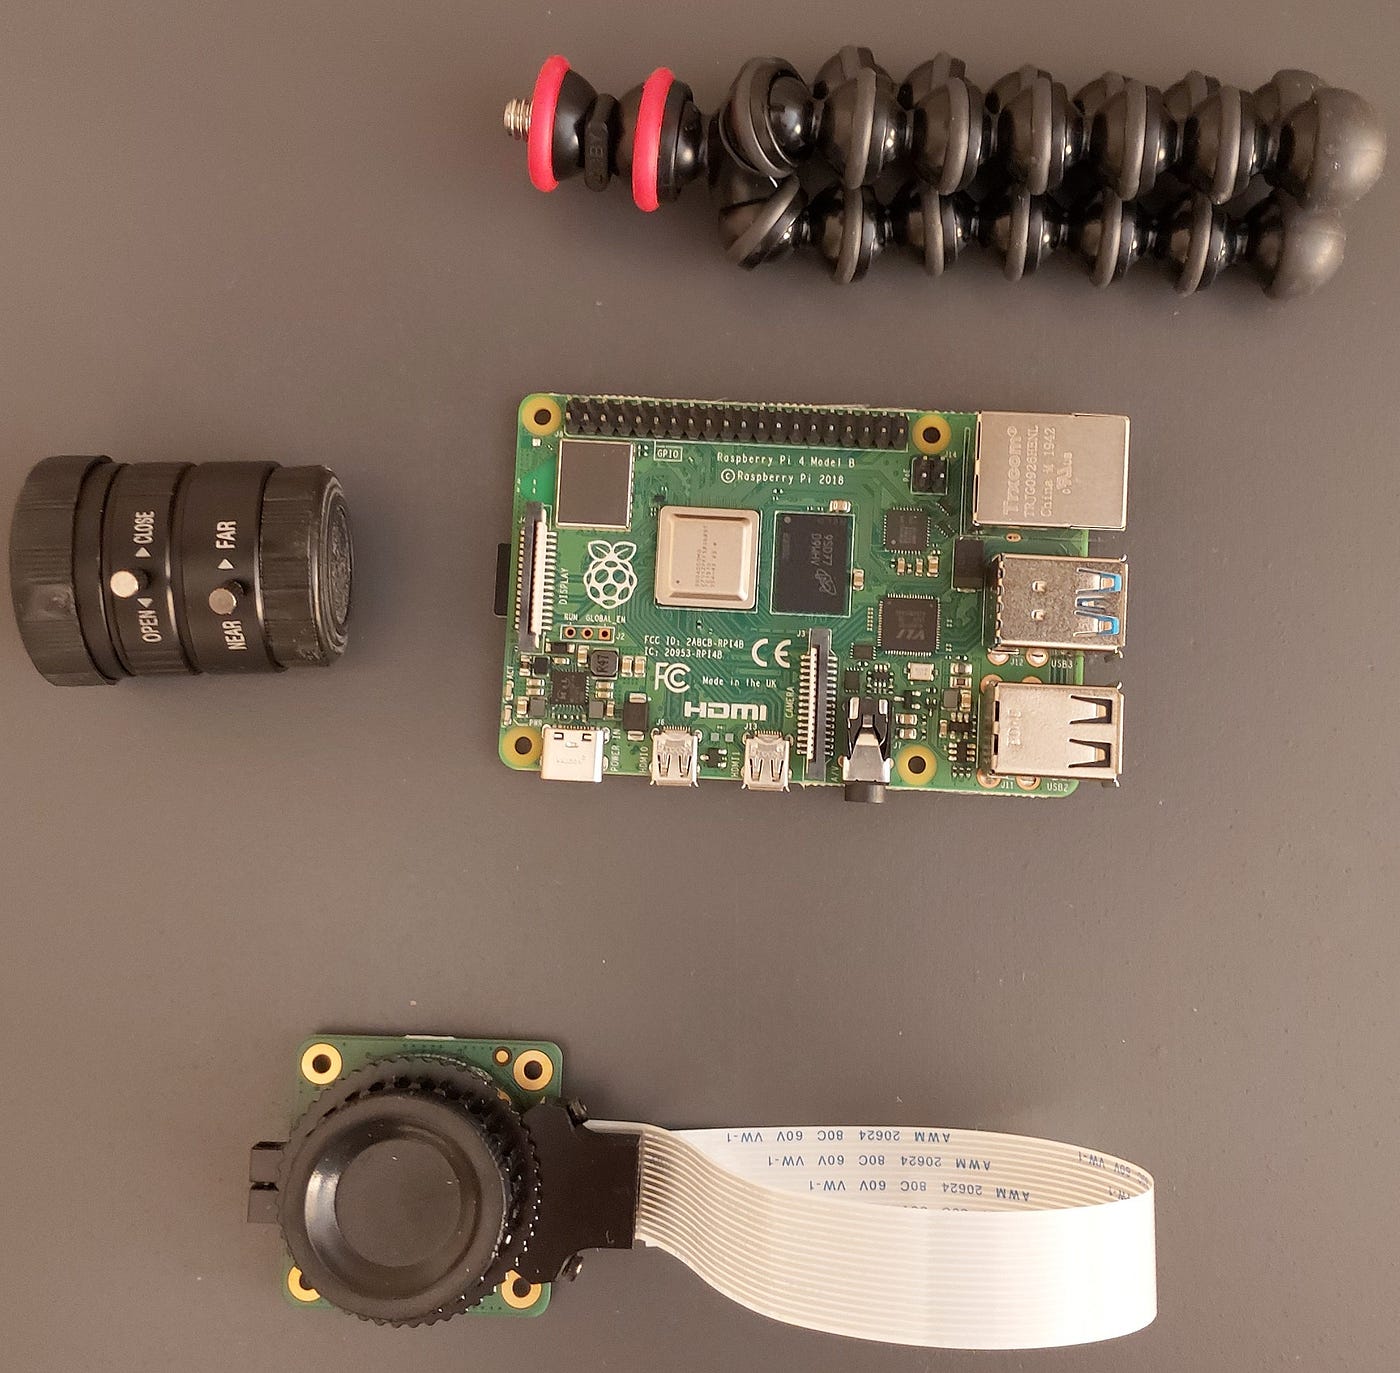
i. What you'll need
There are multiple options but in this guide I will requite you lot two options to choose from, on the role of Raspberry Pi in that location are 2 camera modules, I will talk nigh them later.
- Laptop
- Raspberry Pi 4
- Power supply (Preferably purchase the official source together with your Raspberry so equally non to have any problems, if y'all exercise non take much experience USB-C Power Supply.
- Smartphone with Mobile Hotspot function
- Micro SD card
- Raspberry Pi High Quality Camera (It is the one I will use in this guide, merely you can utilize the Raspberry Pi Camera Board v2 It is the older and cheaper version.)
- 6mm 3MP Wide Angle Lens for Raspberry Pi HQ Camera 3MP (The HQ camera module allows us to use lenses, this element is optional in example of using the second photographic camera pick).
- Flex Cable for Raspberry Pi Camera (Information technology is unremarkably included in the purchase of Raspberry Pi Camera modules).
- Camera tripod (Note: only in instance of using the HQ module and you see it necessary). The advantage of the HQ module is that it has a standard ane/4"- 20 tripod mountain, which is what near current tripods accept, I leave you a link to a purchase option on Amazon.
Optional:
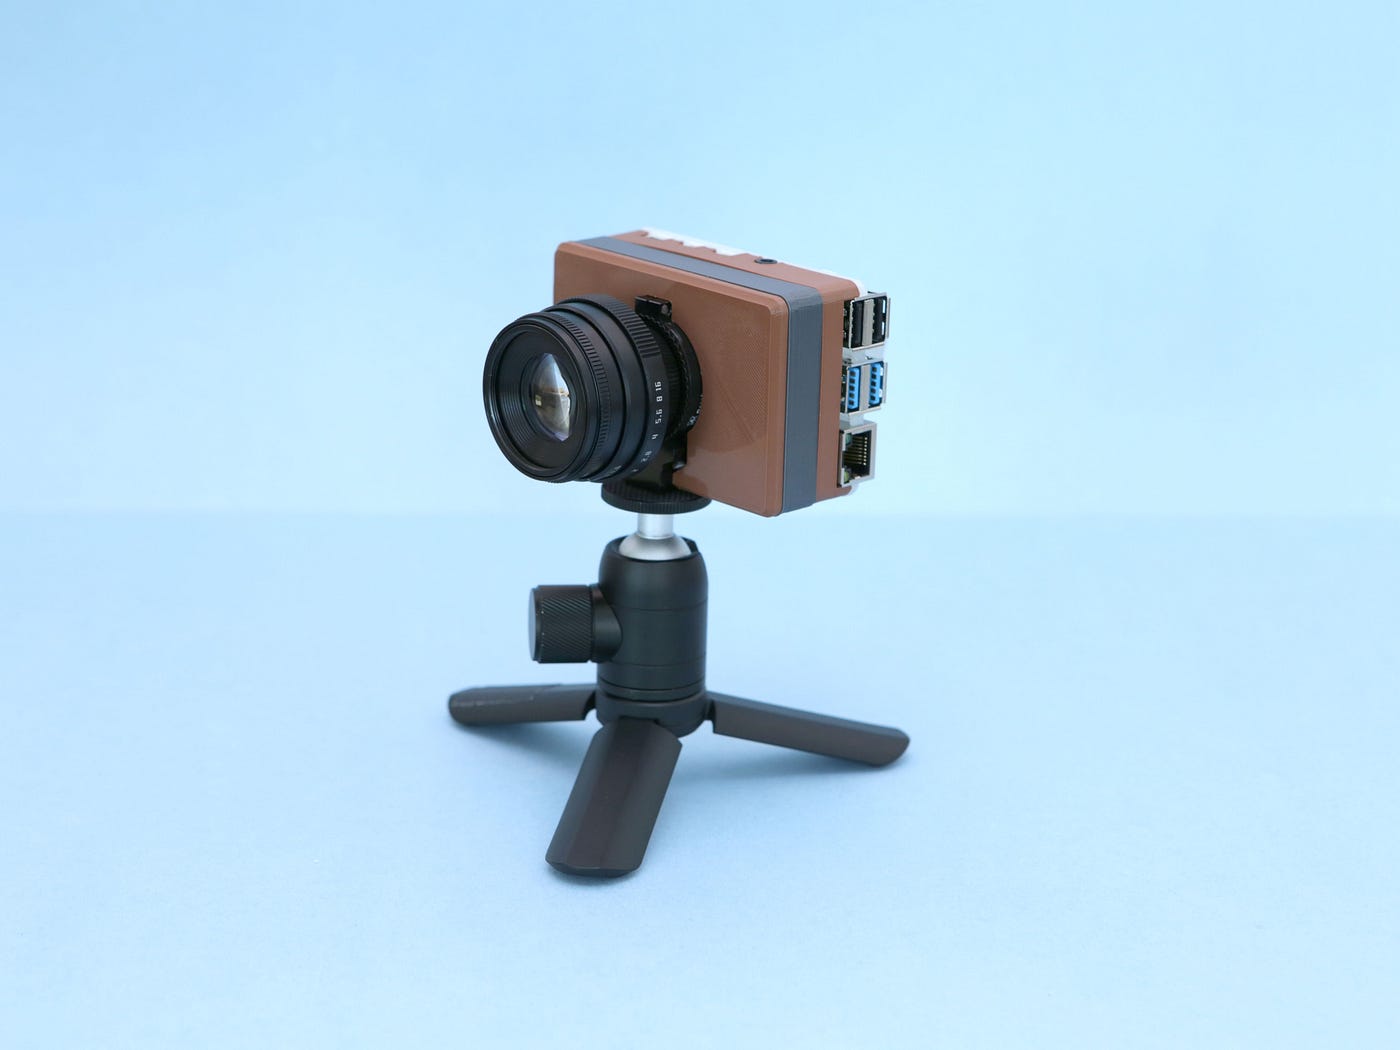
- Raspberry Pi HQ Camera Example (In case you lot have a 3D printer or access to make 3D prints I exit yous a link and then you lot tin impress a camera-shaped instance, later I leave you the paradigm of how it would wait).
- If you use the Case, you volition need custom screws M2.5, We will need 12mm and 8mm long, although to have reward you can purchase some 10mm and 5mm they can be useful for other projects, you can become them in Amazon or specialized electronics stores.
If yous are going to use the 3D model case, here you accept an image of what it would await like, information technology's amazing, don't y'all recall?
Now we will talk about the two modules that I mentioned.
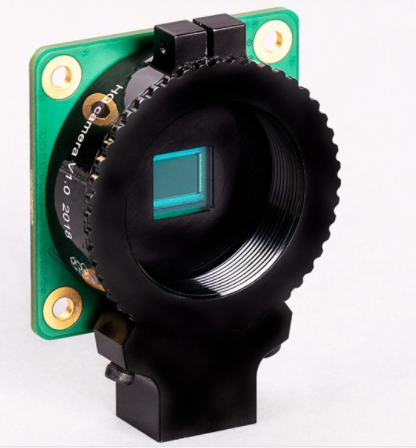
i.1 HQ Camera module
This module is the latest Raspberry Pi camera accessory. It offers higher resolution (12 megapixels, compared to the previous eight megapixels) and sensitivity (approximately fifty% more area per pixel for improved performance in low lite weather condition) than the existing v2 camera module, and is designed to piece of work with interchangeable C and CS mount lenses. Other lenses can exist used using adapters.
6mm CS mount lenses and 16 mm with C-mountain are examples of all the uniform ones that exist. The high-quality camera offers an alternative to the camera module v2.
For industrial and consumer applications, including security cameras, that require the highest levels of visual fidelity and / or integration with specialized optics. It is compatible with all Raspberry Pi models, the latest version of software.

ane.2 Raspberry Pi Camera Board v2 (eight Mp)
This eight Mp camera module is capable of capturing 1080 px video and images, it can be connected to all Raspberry Pi models. Ready to plug and play, well suited for lap photography, video recording, or for employ in security and motion detection applications. Just connect the included cable to the CSI port of the Raspberry Pi.
The module is pocket-size measuring 25 mm 10 23 mm ten 9 mm and has a weight of 3 grams, making it perfect for mobile applications or others where weight is a very of import gene.
The sensor has a resolution of viii megapixels and has a focusing lens. As for images, the camera is capable of taking notwithstanding images up to 3280 ten 2464 pixels and 1830p30 videos.

two. Camera setup
2.1 Connection
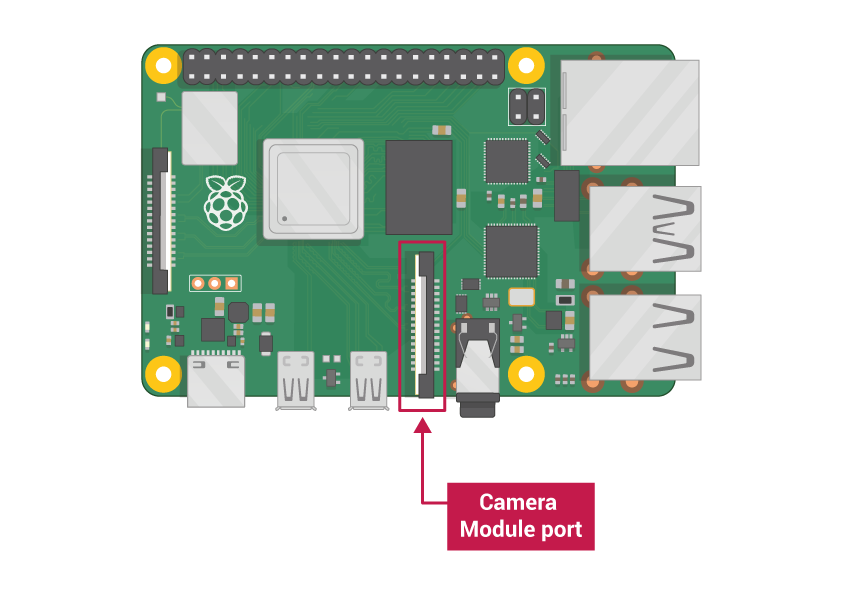
All current Raspberry Pi models have a port to connect the camera module.
Note: If you lot want to use a Raspberry Pi Nothing, y'all demand a camera module cable that fits into the smaller camera module port of the Raspberry Pi Zero.
Connect the photographic camera module. Make certain your Raspberry Pi is turned off.
1. Locate the camera module port
2. Gently pull up on the edges of the plastic port clip
3. Insert the flat cable of the photographic camera module (Note: Make certain the cablevision is in the correct direction. The bluish side of the cablevision is facing the jack connector and the USB ports)
4. Put the plastic clip back in place.


Connecting the HQ module in my example would look similar this:

I opted to only employ the camera mount of the 3D model with the Raspberry so I will prove you a bit of how to use the screws and the last outcome.

At present I only need to connect the lens that on this occasion I used the 6mm one, you can skip this office and go to 2.ii if you used the eight Mp V2 option.

We have to remove the dust cap for the 6mm lens and the C-CS adapter so it would be as follows:
The lenses come with two covers, one on the side of the lens and the other for the input that connects to the module.
2.1.1 Fitting the lens
The 6mm lens is CS mountain so yous practise non need the C-CS adapter ring. It won't focus properly if the adapter is installed, so remove information technology if necessary.
And so turn the lens clockwise all the mode to connect it with the back focus adjustment band. It should not be squeezed too hard because yous can damage the lens or the module, only keep it tight.

two.1.ii Back focus aligning band and lock screw
The back focus adjustment ring should be fully screwed in for the shortest possible back focal length. Use the dorsum focus locking screw to make sure that it does not motion from this position when adjusting the aperture or focus (When purchasing the HQ module, it includes a screwdriver of the verbal size to be able to manipulate the locking screw).

Once gear up and installed, our lens will wait similar the post-obit.

Once the lens is installed and the module is connected to our Raspberry, we can continue with the configuration when turning on and entering through VNC.
2.2 Raspberry Pi Configuration by VNC.
- Turn on your Raspberry Pi.
- Enter via VNC from your reckoner to your Raspberry.
- Become to the master bill of fare and open Raspberry Pi Configuration.
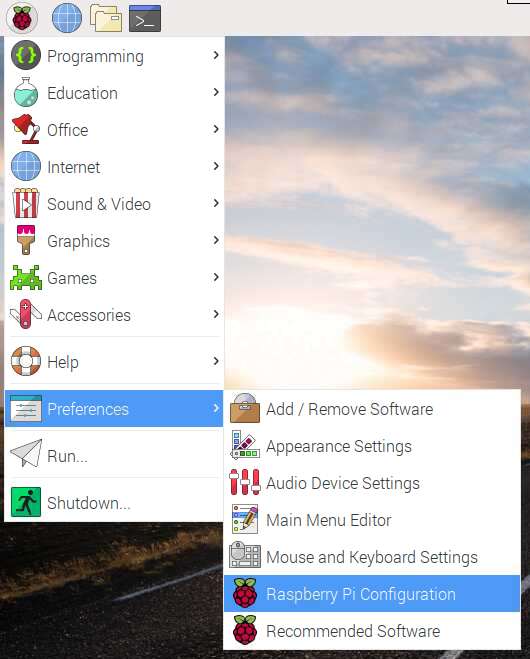
Select the tab Interfaces and make sure the camera is enabled.
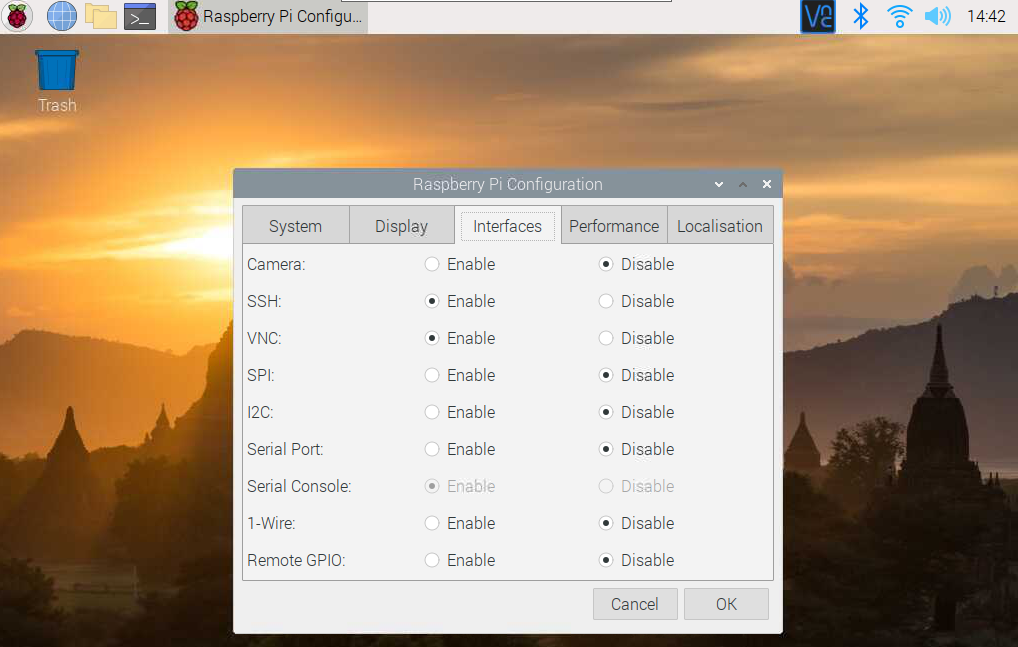
Reboot your Raspberry.

In one case restarted, we will make some changes in VNC within the Raspberry desktop, when executing some commands it will show united states of america the preview of what it is going to capture in VNC information technology is not possible unless we make these changes. The showtime thing is to go to the VNC icon and click.

The following window will open, where we will observe a box on the correct side, nosotros volition click.

We will click on "Options".

We will go to the tab "Troubleshooting".

We will click on the "Enable direct capture mode" box and then we will click on Apply. This volition allow usa to run into the preview of what our camera module is capturing. It will go to black screen for a few seconds and when information technology recovers the prototype information technology volition exist gear up, information technology is not necessary merely you tin restart the Raspberry to start with the next step.

At the moment the camera is out of focus and so we demand to run a command to access the view. So let's open up the Raspberry last.

raspistill is a command tool for capturing images from the camera. To verify that the camera is installed correctly and use the camera simply every bit a viewfinder, without saving a photograph, enter this control:
raspistill -t 0 It volition give u.s. a blurry image for sure in the case of the HQ module for the V2 module information technology volition non have a major problem.

Now we will see the steps to focus the module with its lens.

2.ii.1 Aperture
To fix this yous take to adapt the discontinuity, keep the camera with the lens away from you.
Rotate the middle ring while holding the outer ring, farthest from the camera, stable. Shift clockwise to close the discontinuity and reduce epitome brightness. Turn counterclockwise to open up the opening. Once y'all are happy with the light level, tighten the spiral on the side of the lens to lock the aperture.

2.2.2 Focus
Starting time, lock the inner focus ring, labeled.
"NEAR FAR", in position by tightening its spiral. Now hold the camera with the lens facing abroad from you. Hold the two outer rings of the lens and turn clockwise.
Until the paradigm is in focus, it volition take iv or 5 full turns. To adjust the focus, plough the two outer rings clockwise to focus on a nearby object. Rotate counterclockwise to focus on a distant object y'all will most likely need to adjust the discontinuity again after this each time you remove and attach the lens.

Afterwards focusing, we will have to shut the window, maybe we cannot because the prototype is very large and the close icon does not appear, in that case nosotros will take to admission by SSH and use the command:
sudo reboot To be able to admission once more by VNC.
2.2.3 Test epitome.jpg
You should now come across a clear image and you tin can have a exam photo by entering the command:
raspistill -o test.jpg When you press ENTER, a live preview image will appear, and later on a predetermined period of five seconds, the camera will capture a single nonetheless image. This volition be saved in your home folder and named test.jpg.

This is what the epitome I took with this control looks similar:

2.2.iv Video test
To tape videos, raspivid is what you need. Endeavour it with this Terminal command:
-t 10000 is the time that it will be recording video, 10000 milliseconds would exist 10 seconds of recording. h264 is the video format to play in vlc, a player that includes the Raspberry Pi OS, in instance yous want to modify the format to MP4 which is a more mutual and friendly format for editing, at the stop I volition leave you some commands and links for this .
raspivid -t 10000 -o testvideo.h264 
We can see the preview of the file and then in the Raspberry Pi folder we will observe the file to be able to reproduce it.

3. Command the photographic camera module with Python code
3.1 Preview
The Python library picamera allows you to command your photographic camera module and create amazing projects.
Open up a Python 3 editor, such as Thonny Python IDE or taking reward of the previous tutorial [VS Code on Raspberry Pi] (https: //) nosotros can employ the VS Code, we will create a folder on the desktop called camera or photographic camera, we will right click to Open the options, we will select "Open electric current binder in final", to direct open the folder and the terminal, yous can also do this in the final with the cd command to locate u.s. in the camera folder.
In one case located within the terminal in the folder we will use the command:
code . With this we will directly open up VS Lawmaking in the folder that we are going to work with.
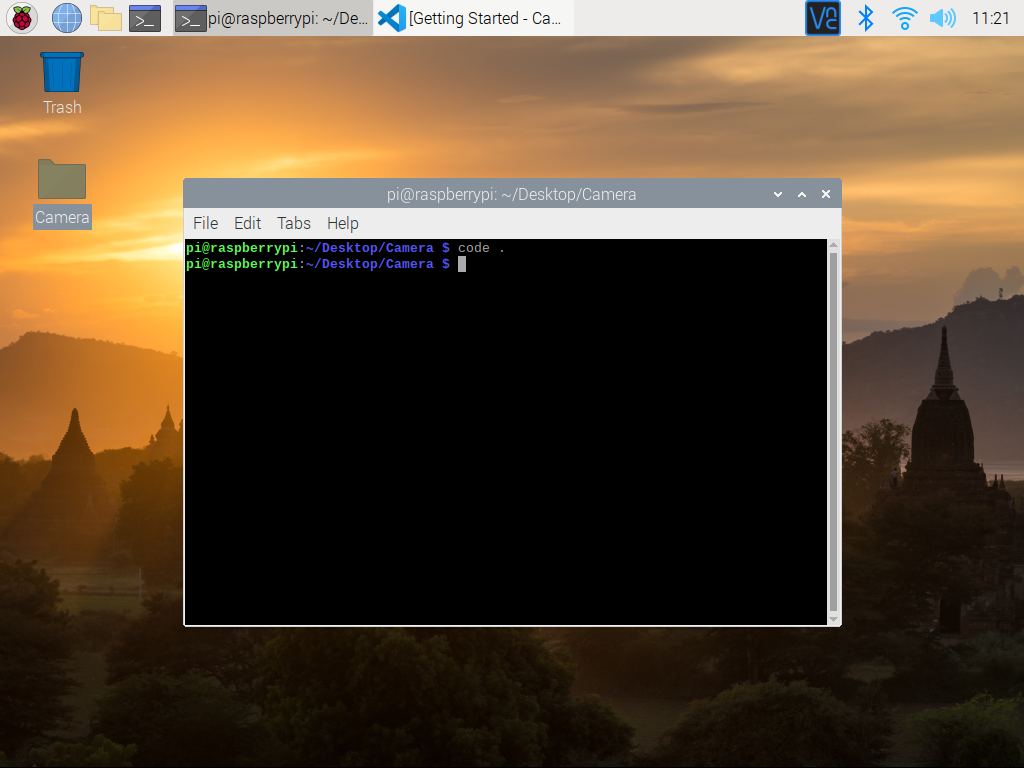
Open a new file and salvage it every bit camera.py.
Note: it is of import that you never salvage the file as picamera.py.
In VS code we tin can find the icon to create a new file.

Now we will click on "CTRL + South" to save and the post-obit window volition appear. We enter the name of our file to exist able to enter the code.

Before entering the code we must make sure that we take the Python tool for VS Code installed. Verify with the image that yous accept installed the one that we volition use.

Enter the following code that will allow us to do the same office of giving united states a preview epitome to verify that our lens is in focus. If you accept already washed this step and accept not disconnected the camera, you can skip this step and go to the following code:

We utilise "CRTL + S" to save and at present nosotros will open a concluding in VS Lawmaking for this projection.

Now we tin can see the terminal in the lower role and nosotros only need to run the lines of code with the button that has the VS Code in the upper correct part. You lot tin can as well do this from the final in the traditional way and use the command:
sudo python3 camera.py
Y'all tin encounter at the bottom the execution of the command.

When executed, it will open a very big window that will close after 5 seconds as we have divers in slumber (5), we take to define a time if the window will not remain open as in raspistill -t 0 then we would have to utilise SSH to enter the sudo command reboot to enter once again and proceed with the next code.
3.2 Photo
At present to take some pictures you can create a 2d file in my case phone call it cameratake.py, alter your code to add a camera.capture() line:
Note: it is of import to use a slumber of at to the lowest degree two seconds before capturing an epitome, because this gives the camera sensor time to observe light levels.

You should run across the open up camera preview for five seconds so a still image should exist captured. While the image is existence taken, you tin sentinel the preview briefly adjust to a different resolution. Your new image should be saved to the desktop.

Image taken by the code:
three.three Video
Now shoot a video!
Modify your code to remove capture () and instead add together start_recording () and stop_recording () to start and end recording. Your lawmaking should wait like this at present:
Run the lawmaking. Your Raspberry Pi should open a preview, record 10seconds of video, so shut the preview.


4. Extras
4.1 Video format MP4
Raspberry Pi captures video as a raw H264 video format. Many media players will refuse to play it, or play it at the incorrect speed, unless it is "wrapped" in a suitable container format like MP4. The easiest way to get an MP4 file with the raspivid command is using MP4Box.
Install MP4Box with this command:
sudo apt install -y gpac Capture your raw video with raspivid from the final and wrap it in an MP4 container like this:
Alternatively, wrap the MP4 format around your existing raspivid output, with:
MP4Box -add video.h264 video.mp4 With this we come to the end of this guide you lot can practice making a lawmaking in Python to exit your video in MP4 format putting into do the acquired knowledge, to review more than near the MP4 format in Raspberry visit raspivid.
You tin take reward of the Git and VS Code guide to upload these codes to your Github.
If you desire to know more than about Raspberry Pi and the use of the camera visit Camera Raspberry Pi..
Visit my repository on Github.
Source: https://medium.com/geekculture/camera-setup-on-raspberry-pi-4-912e7d415cdf
Posted by: shriversincy1977.blogspot.com
0 Response to "How To Turn On Raspberry Pi Camera"
Post a Comment